Jana

Jana

Tuesday, January 31, 2012

Tuesday's Food: Homemade Biscuits Like Grandma Made

I've been on another bread-making kick lately. And I love it! I really, really do. And recently I found a recipe for biscuits that I'm putting in my list of must haves. My oldest son said they tasted just like Cracker Barrel biscuits, and I'll tell you, they really do. And the best thing about these biscuits (besides the taste, obviously) is you can freeze the biscuits to pull out on those mornings you are in a pinch or for those family meals when you forgot to pick up bread at the store.

The only thing I found frustrating about the website I got it from was there were no pictures. I don't blame her. There have been times I have gotten so excited about a meal that I forgot to take a picture. And these biscuits are worthy of that little forgetfulness. I just can't "Pin" this recipe on Pinterest without a pic. So, I will do it for you!

ALL CREDIT FOR THIS RECIPE GOES TO Granny's Kitchen.

Granny's Homemade Biscuits

2 cups all purpose flour
1 Tbsp baking powder
1/2 tsp salt
2 Tbsp sugar
1/4 cup butter (plus 1 Tbsp butter, melted...my addition to the recipe
3/4 cup milk

Combine all dry ingredients and blend well with a whisk. Cut in butter until resembles coarse bread crumbs. Stir in milk until all comes together to form a dough ball. Turn out dough ball onto a heavily floured surface. She uses wax paper. Let set for a couple of minutes and then knead for about a minute and then re-flour surface and pat out to about 1/2" thick. Cut biscuits with floured biscuit cutter and placed into ungreased baking pan. Form remaining dough into ball and repeat until all dough is made into biscuits. Bake in 425-450  degree oven for 12-15 minutes. My addition: when the biscuits are done, pull out of the oven and brush lightly with melted butter. 

This recipe will make approximately 12 biscuits. It will freeze well, too. Just place your cut biscuits onto a cookie sheet lined with wax paper or parchment paper (I used a floured cookie sheet, and it worked fine for me) and place cookie sheet into the freezer making sure to keep level. Once frozen, remove and place into a freezer bag and place into the freezer. When ready to use, just follow baking directions and bake only the amount you need. You do not have to bake them all at one time.

And that's exactly what I did this morning! I pulled out one for me, baked it in my toaster oven. PERFECT! You MUST try this recipe. Make these before a big holiday so all you have to do on that day is pull them out and bake. For real, this is awesome! :)

Happy baking, everyone!

Here's my single serving biscuit with my coffee. Notice I labeled the bag with the baking directions. 

Monday, January 30, 2012

Monday's Devotion: You are a Treasure

"For you are a holy people to the LORD your God. The LORD your God has chosen you out of all the peoples on the face of the earth to be his people, his treasured possession." Deut. 7:6


A little over 3 years ago, I reached the heaviest I have ever been. Granted, I was about to have my third and final baby (in 3 1/2 years), but my focus was on those horrible numbers on the scale. I worked out my entire pregnancy, but still managed to hit a weight I had always sworn I would never get to. In the hours after having my baby, I was in my hospital room doing chair lifts and little crunches so I could quickly lose that baby weight. After 3 years of getting in shape, working out, on average, 45 minutes a day, and eating right, I finally hit my pre-pregnancy weight THE DAY my baby turned 3 years old. For 3 years I watched as so many other mamas had babies and popped right back into place, or at least very close to it. I kept making excuses saying, "well, this is her first baby" or "she was small already", but it was when 4 other ladies had their 3rd child roughly in the same time frame I had my 3 that sent me into a self-degrading tailspin.

THEN THE LORD SENT ME ENCOURAGEMENT. Well, he had been sending me encouragement all along, but for some reason last week that encouragement hit me. So I'm going to share with you the words I wrote in my prayer journal.

Lord, you send me these little reminders to let me know how much you love me. I have such a negative view of myself physically and personally. Satan loves to dangle in front of me how much I'm not good enough. I'm not fit, or smart, or loving, or patient ENOUGH to be of any worth. And some days are worse than others. I just want to be loved and you show me how much you love me. You remind me in so many ways that I am beyond good enough for you. Thank you for those reminders. Thank you for loving me with so much passion. Fill me with your love. Run  my cup over....


What I realized in those moments of tearfully writing my prayers out to the Lord was that I was his "treasured possession." Satan sure likes to make me think that being this weight is not good enough. And as a result of thinking I'm too heavy to be loved, that leads down a dangerous road of thinking I'm not smart enough, or I'm not loving enough, or that if only I was 30 pounds lighter would I have true friends who want to be around  me. But God is so good. God is so loving. God cares. He knows  my struggles, but he also knows my worth. And to Him, I am a treasure. I am a priceless possession. I am His. And that gives me a peace that passes understanding.

Know that you, too, are also God's priceless possession. When you start putting yourself down, that is Satan's way of putting worldly thoughts between you and a God who loves you so much for who you are. There are seasons in your life when things seem horrible, but if you remember that God has a plan for you, you can find joy in what he has created in you.

Photo Credit

Tuesday, January 24, 2012

Tuesday's Food: Banana Bites

So circling the Pinterest, there were tons of frozen banana treats. And lucky for me, they came just in time for Abigail's birthday party. They were the first item to be made for the party ahead of time, the easiest thing to make, and the first food to be gone from the party food. With all of that, they are also pretty good healthy snacks. I mean, who doesn't like something that tastes like chocolate-covered vanilla ice cream?

So with that being said, here's the recipe:

What You'll Need:

  • 2-3 large bananas 
  • melting chocolate (mmm...dark chocolate)
  • fork
  • plate (the flatter, the better) 
  • parchment paper
Instructions
  1. Slice the bananas into to 1/4-1/2 inch slices. 
  2. Melt chocolate according to package. (I did double broiler and the microwave kind) 
  3. Laying the banana on the fork, dip into chocolate until completely covered. With the chocolate covered banana still lying on the fork, gently tap the fork on the bowl or whatever you have the melted chocolate in. Lay the banana on a parchment-lined plate. 
  4. Once all bananas are on the plate, freeze for a minimum of 3 hours or as much as overnight. 
  5. Once completely frozen, eat or store in an air tight container and in the freezer. 
YUUUUMM! For serious, you will be happy you tried these. These are a great treat for the kids. Make them the night before and then give them as an after school snack the next day! Give them a go and let me know what you think! 

From this... 
...to this! Yum! 

Friday, January 20, 2012

Friday's Review: Professional v Homemade Birthday Party

I love throwing parties. I really, really do. And since I'm not working anymore, we are throwing parties on just Joe's paycheck now, which means I'm always looking for ways to have a great party at a decent price. I usually throw my kids' birthday parties, but the boys have had a few at a professional place. This year I decided to keep track of every expense for Abigail's birthday party to see if throwing one for her is worth every cent or if I should just let the professionals do it. If you were also wondering if it is worth it, I'll give you a run down of Abigail's party, how much it cost per person, and then compare to the average price of taking your kids to Chuck E Cheese, a painting place, or a bouncy place.

And just as a little side note, I know there are some who are in the opinion of not throwing kids a big party or a party with a lot of people. I was actually recently criticized for throwing my 3-year old such a big party. The way we Debneys look at it is everyone should feel special on his or her birthday party. Joe doesn't necessarily want a lot of people, I only want my closest friends, but the kids are all social kids who love having a lot of people. So if that is how they feel special, then we throw parties accordingly.

Planning:

I have to plan the birthday parties for my family months in advance. We are all holiday/special event babies, so if I do want to go somewhere, we have to plan in enough advance to make sure we can get what we want. If you don't know what I mean about holiday/special event babies, this is what I mean:

  1. Abigail: January 19th, which is usually around MLK weekend 
  2. Joe: February 5th, almost every year it's right near the Super Bowl, which works for me because he LOVES football, so we just have a Super Bowl Birthday Party for him every year. 
  3. Jed: May 25th, TWO THINGS: this is usually Memorial Day weekend and near the last day of school. In fact, he was was born on the last day of school and his first year at school ends on his birthday this year. 
  4. J: June 17th. It's almost always Father's Day weekend. This year his birthday is actually on Father's Day. 
  5. Jana (ME!): November 17th. That is usually 1 week before Thanksgiving, right before Thanksgiving break, right around the Carolina/Clemson rival football game, and right before Black Friday. Tricky! 
So, obviously, I need to plan in advance. Every year right after Abigail's birthday, I start looking around the stores to see what they have on sale. Since her birthday is near New Year's, we decided last year that this year's party was going to be "Stars", especially since most of the plates, napkins, and decorations on sale have stars on them. Savings!!

About two months before the actual birthday, I start making a list of ideas of what to make for food and what kind of decorations. I look at what the stores have, brainstorm on a notepad, and search the internet (Thanks, Pinterest!!!) for ideas. 

One month before the party, I send out Evites. This saves us money big time. But I always ask for addresses for those who request a hard copy invitation. My grandfather always gets an actual birthday card. 

Two weeks before the party, I plan out what needs to be made and when the decorations need to be up. This year my husband had an election to conduct, so I knew that I wasn't going to be getting a lot of help from him. I needed to plan specific days that would be focused on making decorations, which foods could be made ahead and still be fresh, and what needed to be cleaned on which days. No point mopping until the night before, right? 

A big, BIG help this year was to decorate the night before. That way, the day of the party could be focused on last minute cooking, setting out food, and getting balloons blown up and placed properly. I also reserved the day of for final vacuuming, sweeping, mopping. 

Day of: we did the last minute cooking, cleaning, set up. It worked great, and I had time to sit before the party. Abigail's first party was in the evening. I was afraid of having a party for little ones in the evening, but it turns out great, in my opinion. Not only do I have the time to finish last minute stuff, but Abigail was able to get a nap, take a bath, and get dressed before everyone showed up. Also, the kids all get worn out at the party, so parents get to put their little ones to bed as soon as they leave. Nice for everyone and (my personal favorite) people don't have to rearrange an entire day around a kid's birthday party. 

Menu
Chicken Nuggets (got four bags of Walmart brand chicken nuggets) 
Banana Bites (Pinterest) 
Pretzel Bites (Pinterest or see my version here)
Veggie Plate 
Fruit Plate
Cupcakes 
Homemade marshmallows (Pinterest or see my version here
Chips and Salsa
Chocolate Chip Cookie Dough Dip (Pinterest or here
Bowl of Twizzlers (thanks MOM for that Christmas present) 
Bowl of Caramel Corn (again, thanks Mom!) 
Juice boxes (for kids) 
Sweet Tea
Lemonade 

See how pretty it looks? It actually was enough to feed everyone and  have a few leftovers! 

Decorations

Stars are bright and shiny, so I wanted my daughter to have a house full of things that just shined! Since the party was in the evening, with all the lights on, this worked out great! I picked up a few streamers from the store, left out three stands of white Christmas lights, made a star (Pinterest!), and bought two boxes of cheap dollar tree aluminum foil. 

For the table, I had already invested in a few cheap plastic table coverings for other events, so I just placed one that would highlight the foil-wrapped serving dishes. Let me tell you, foil-wrapping it was as GREAT! It made for easy, easy clean up, and kept the chicken decently warmed almost all day since I made those early. 


I made these stars from toilet paper rolls I had been saving for a few weeks. Easy, easy, but they need to be made a day or two in advance to give time for drying. But they were cute!!! 

We hung a few stars around and lit some lights. It was all very pretty once it was done! 


Guest Gifts

I found a cute tutorial (on Pinterest) on homemade crayons. So I found a mold that was "star" shaped, made some crayons, printed a star worksheet, and got packets of star stickers, glow sticks, and star bouncy balls at the dollar section at Target. I replaced the bouncy ball and the glow stick for the little ones (crawlers and barely walkers) with a pack of Num Nums and a rubber duck (all found pretty cheap at Wal-mart). They turned out great! I also found a HUGE sheet of crispy treats at Big Lots for $5 each. Each sheet yeilded 20 stars I cut out, which was perfect for the older kids at the party. 


Here's the big comparison: 
So how much did all this cost per person? We had 70 people TOTAL (yes, 70, don't judge). The cost per person was a little over $4 per person. So, obviously, if you have only 20 people at the party, this would be a pretty decently priced party. 

I compared that with the local professional places that do everything for you. Let me tell you, those places are nice. You literally don't have to do anything. It is a LOT less stressful, and no one will care if your house is messy because NO ONE WILL BE THERE! After looking at those places' prices, they are averaging between $8-$12 per person, with generally a limit of 15 guests. And this is for the cheaper places. I found another one today I was thinking for Jed's birthday. Their average price per person was $22. Um, no thank you. 

So, you can have a nice party at your home for a decent price. OR you can let someone else do it for you for a little bit more. It's up to you to weigh the cost. I had fun. My daughter had a blast, and the guests all seemed to really enjoy themselves. 

Thursday, January 19, 2012

Thursday's Crafting: DIY Superman Cape


This past Christmas, I had the pleasure of coming across a great tutorial on how to make a Superman cape. Lucky for me, I have an adorable nephew who is just as daring as Superman himself. So why not make him a cape? So today I'm going to share with you the tutorial I found to make the cape. It was SUPER EASY and only took about 15 minutes to make.

A few things before I give you the link:

1) I didn't have the same type of materials on hand to make it exactly like she said to, but I did have a TON of fleece that I bought LAST winter when it went on sale. So I didn't double side it like she did.

2) I made it big enough for little Connor to wear for a while. I tried it on my youngest son, who is about a foot taller than Connor, and it fit him great! So make adjustments as necessary.

3) I didn't take picture by picture of what I did, so all I have as personal examples are pictures of the finished product. Go to the link for more pictures, ideas, and a step by step tutorial. Trust me, it makes more sense the way she shows it.

Cape Tutorial from The Pleated Poppy


Finished product on my 5 year old son (Front) 
Finished product on my 5 year old (Back)


Connor LOVES it! Yay! 


Wednesday, January 18, 2012

Wednesday's Cleaning: Room by Room Series: The Bedroom, part 2

It's Wednesday again, and you know what that means? Time to focus on cleaning! The current series, "Room by Room" has us focused on the Making the bed today. I know what you are thinking. Really? An entire post about how to make your bed? When I first saw the post from Melissa Ringstaff's Household Notebook, I thought the same thing. Once I read it, though, I realized she had some great tips on how to properly make a bed and maintain cleanliness with it weekly and daily.

(And if you missed last time when we began the bedroom, here's the link. If this is your first time to this series, I only highlight points from Melissa's page. For the entire list for today, please go here).

Making the Bed


Washing the Bed Linens: Weekly (Highlights) 


1. Allow the mattress to air for a while. Um, absolutely! Especially with the kids, especially boys. For some reason, boys are okay with going to bed with all kinds of funk, so washing the sheets for them once a week is really important. PLUS, that mattress really needs a good airing out once a week.

2. Rotate mattress. Now this doesn't say flip mattress, but I feel that flipping and rotating are pretty necessary. I don't really do this once a week, but maybe I should, huh?

How to Make the Bed: Weekly (Highlights)

1. When using a comforter, often the flat sheet is placed with the right side down so that when you turn it down at the top, the ride side of the sheet is visible. Now I have been making my bed for a LONG time, and this never occurred to me. Who cares if the flat sheet is the wrong way? You have a big comforter, or in my case, a quilt, covering that sheet. I always didn't like the way the underside of the sheet looked when making my bed, so, again, I'm not sure why I didn't think of this first.

2. To correctly make a hospital corner at the foot of your bed, lift the side of the sheet and tightly tuck in the portion that is hanging down. Okay, never heard of it called a "hospital corner" but it makes sense. And I do this when I am seriously making my bed, but not regularly. I don't like the way it feels on my feet. BUT is is good for the guest bed, for sure!

3. Bedspread v. Comforter. Apparently, if you have a bedspread, you cover the pillows, but if you have a comforter, you don't. Who knew? I sure didn't? I thought you always cover the pillows. Maybe it's preference?

How to Make the Bed: Daily (Highlights) 


1. Upon waking, turn the covers down to allow the sheets to air for an hour or two. *Allowing the bed to air helps to retain a fresh smell of the linens and the bedroom* What?! Seriously, for years, I get out of bed, turn around, and immediately make up the bed. Now I feel that maybe after the kids are off to school , I am going to start going back to pull back the covers while I put away breakfast and tidy the kitchen and bathrooms.


2. After breakfast, continue making the bed. See? She even suggests that is done this way! For you SAHMs, this is great for you! For you working moms, you are not going to have the luxury to do this. I know. I've been there. So maybe the "proper" bed making can be done as soon as you get home from work or this "airing out" can be done on the weekends. I think it's smart, though, so try it at least once a week.


Photo Credit 

So here's a little anecdote:

Last week, I was getting seriously frustrated about how messy my kids' rooms were. I feel like every time I turn around, a tornado has blown through. I know, mom, what goes around comes around, but I'm trying to create little cleaning monsters. I want it to be habit for them to have their room decently cleaned, and I refuse to be the one that does it for them. They will never learn that way, and I will not tolerate a messy room. Okay, back to the story. So as I was planning, preparing, and organizing the house for Abigail's birthday party last week, I asked the boys to just keep the rooms clean for mommy. Please? And, of course, they didn't. So instead of yelling at them, which doesn't seem to work, and I feel that I'm training them to ignore their wives one day, I decided to show them my room and give them a little trick. I told them that even if their room is a mess and there are things lying all around, if you make your bed, your room automatically looks cleaner. So I opened my bedroom door and showed them my room. Yes, I still had shoes on the floor instead of in the closet, and there were a few things out of place, but my bed was made. I asked them, "Does mommy's room look clean?" and they said "yes!" (although Jed, my MESSY child, was quick to point out my shoes on the floor). I then told them to stand outside the door. I closed it, and unmade my bed. I made it look like it does when Joe and I first get up. I opened the door, and they were amazed at how messy my room looked. I told them the only thing I changed was the bed. I then told them to count how long it took mommy to make the bed (not seriously make it like Melissa would suggest, but enough that the sheets and pillows were straight and the comforter was pulled over the bed and smoothed down). 24 seconds. That's how long it took. And, again, they were amazed. I think the lesson clicked for them for a little bit. If mom says clean my room, the first thing I should do is make the bed. And honestly, they have been making their beds first thing ever since. I am impressed. And proud.

One other little side note: If are a pretty good at cleaning your rooms or are satisfied with the way you make your bed, this list may not mean anything to you. BUT if you have kids or a husband you want to start encouraging to help around the house, you may want to print Melissa's list or make a condensed version of the list and make a little poster. You can laminate the sheet to make a check list they can use a dry eraser on each day or week, and check off all the steps. I know that your husband knows how to make a bed, but if you want it down a specific way, you may have to actually spell it out for him. He doesn't know your routine or expectations unless you tell him. You may be surprised when he actually does it on the weekend, for your birthday, or for anniversaries. Or for your college/high school/ middle school kid, this would work great!

Next time's topic: Cleaning the bathroom. Come back for the conclusion of this series! Happy cleaning, everyone!

Tuesday, January 17, 2012

I Write for Bounty!

As many of you know, I write articles for Bounty Paper Towels. They have a great website full of great cleaning and crafting tips and ideas. Many of the things I write on here I have also written for them as well. Please see the links below to 20 of the articles I have published.

1. How to Clean Bathroom Grout 
2. Make Cork Angels for Your Christmas Tree
3. Mirrored Balls
4. Pom Pom Snowmen 
5. Hand Wreath
6. Play dough Ornaments
7. Paper Sunflowers
8. No Sew Apron
9. Creating a Christmas Tree
10. Make a Fleece Scarf
11. Make a Paper Fireplace with the Kids
12. Thanksgiving Place mats
13. Easy Snowman Craft for Preschoolers
14. Thanksgiving Memory Shirt 
15. Homemade Leaf Coasters
16. Make Football Cupcakes
17. Make Apple Stamps
18. Making Paper Crowns
19. Making Lanterns
20. Ice Cream Cake 

ALSO, if you visit a few of these, I would really, really appreciate the feedback. I'm limited in what I can and cannot say in some of my articles, but I would still like an honest opinion. Please look at a few, and let me know if any of them was interesting to you!


Tuesday's Food: Pretzel Bites

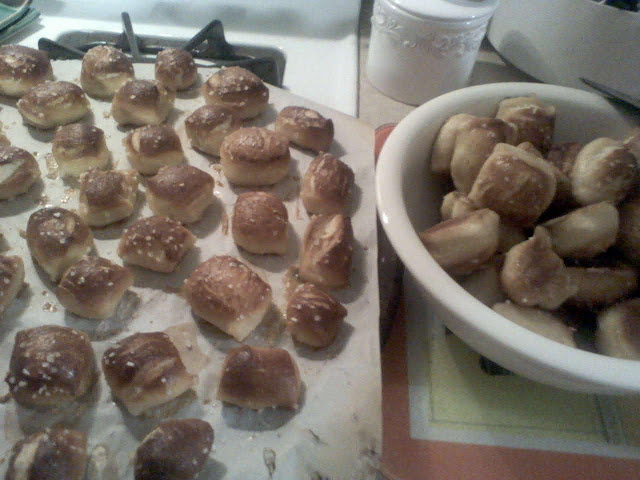
My daughter's birthday was this past weekend, and most of the food and decorations came from Pinterest By the way,  if you have not been to it yet, GO! It saved me a bunch of stress and money while planning my daughter's party. Anyway, the number 1 compliment I got about the food was from the pretzel bites I made. I kind of combined recipes to make them and then added a little something something at the end, and let me tell you, they ARE yummy!

So the two websites I got the recipe from were Get Off Your Butt and Bake and Alton Brown on Food Network. Mostly I got the idea from the Get Off Your Butt website, but I found that she took the easy way out. Her recipe called for taking a biscuit roll and cutting it up to make a pretzel. I wanted to make mine from scratch, so I found the "from scratch" recipe from Alton Brown. His recipe called for actual pretzels, so instead of making the traditional "knot", I just cut mine up into little squares. So you can look up these recipes, or you can refer to mine below. Take a gander and try these super duper easy snacks that will be eaten faster than you can make the next batch!

Ingredients: (This is almost word for word from Mr. Brown. I only made a few slight changes to make it work for me)

  • 1 1/2 cups warm water
  • 1 Tbsp sugar
  • 2 tsp kosher salt
  • 2 1/4 tsp active dry yeast (or 1 packet) 
  • 4 1/2 cups all-purpose flour
  • 4 Tbsp of butter, plus 1 Tbsp melted
  • Butter flavored cooking spray
  • 10 cups water
  • 2/3 cup baking soda
  • 1 large egg yolk beaten with 1 Tbsp water
  • Pretzel salt or kosher salt 
Steps
1. Combine the water, sugar, and salt in the bowl of a stand mixer and sprinkle the yeast on top. Allow to sit until the mixture begins to foam (about 10 minutes). Add the flour and the 4 T butter and, using the dough hook attachment, mix on low speed until well combined. Change to medium speed and knead until the dough is smooth and pulls away from the side of the bowl, approximately 5 minutes. (NOTE: the first time I did this, it worked just like the recipe, but the second time, for some reason the dough was really, really dry. So I added 1 1/2 Tbsp of water to the mix, and then it turned out fine. Just go with your best judgement). Remove dough from the bowl, clean the bowl and then spray the bowl with the butter flavored cooking spray. Return the dough to the bowl, cover with plastic wrap and sit in a warm place for approximately 50 to 55 minutes or until the dough has doubled in size. (I put mine the microwave as recommended in another bread recipe I found a few months ago). 

Preheat the over to 450 degrees. Line 2 cookie sheets with parchment paper and lightly spray with the butter flavored cooking spray. Set aside. 

Bring the 10 cups of water and the baking soda to a rolling boil in an 8 quart saucepan. (This makes a really cool, bubbly mixture!!

In the meantime, turn the dough out onto a slightly oiled work surface and divide into 8 equal pieces. Roll out each piece of dough into a 24-inch rope (THIS IS WHERE I MAKE THE BITES INSTEAD OF THE TRADITIONAL KNOT). Using a pizza cutter, cut the rope into 1 inch cubes. Place onto the parchment-lined cookie sheet. 

Place the pretzels bites into the boiling water, no more than 6 at a time, for 30 seconds. Remove from water using a large slotted spoon. Return to the cookie sheet, brush the top of each pretzel with the beaten egg yolk and water mixture and sprinkle with the pretzel or kosher salt. Bake until dark golden brown in color, about 14 minutes. After bringing from the oven, brush the pretzels with the melted butter (one of the things I do with almost every bread I make). Transfer to a cooling rack for at least 5 minutes before serving. 

Again, this was SERIOUSLY popular at my daughter's party. The only thing I regret is not making some cool dipping sauces to go with them. If you choose to make this, you can also sprinkle with cinnamon and sugar, chili powder, or garlic salt to change the taste to your preference. Enjoy! 


Thursday, January 12, 2012

So I'm finally moving on...

I have been frustrated, lately, with my blog. Not necessarily the content, but how it's not very user-friendly for ya'll. So I'm in the process of transferring my information to Wordpress. For you expert bloggers out there, I don't need anything fancy, I just need something that my readers can easily access past posts. I like what I see on others' blogs (When She Naps and Mommy Time), and I'm ready to finally make the move. I know I am a few days behind in my posts, but I ask that you have a little patience with me as I try to make this transition. Details will be coming soon.

Thank you all for reading and for sharing the love (seeing some of my stuff on Pinterest, other blogs, and Facebook! Yay!!!) I only hope that this move will be a positive change.

See you all soon!

~Jana

PS: Until I am fully ready to launch the new blog, I will attempt to continue to add to this one. I have a ton of stuff I want to share, but am not managing my blogging time well this week! :)


UPDATE: So after trying out a few other websites, and really digging deep here, I have found ways to adjust this current blog to be more user-friendly. I hope I didn't disappoint anyone on not moving! :)

Tuesday, January 10, 2012

Tuesday's Food: Homemade Marshmallows

I made homemade marshmallows; yes I did!! and no, not in the crockpot. Sorry if I suddenly excited a whole bunch of you. But I did make homemade marshmallows, and I was told (by my kids, husband, and brother-in-law) they were BETTER than store bought! Oh man! I can tell you, it wasn't that hard, but it is a little time consuming. So be prepared.

I found the recipe on Pinterest. (I'm over it, Janet. I should be thanking you for my new addiction!) :) It was one of the pins I put on my "I want to make" board that I eventually moved to the "Food I Make" board. Here's the link to the original recipe (from Smitten Kitchen, where I got my homemade poptart recipe!!) , and below is what I did (mostly the same, but I'm adding a little commentary to the process here).

Things You Need:

  • 1 cup powdered sugar
  • 3 1/2 envelopes unflavored gelatin
  • 1 cup cold water, divided
  • 2 cups granulated sugar
  • 1/2 cup light corn syrup 
  • 1/4 tsp salt
  • 2 large egg whites (room temperature) 
  • 1 Tbsp vanilla 

Steps
  1. Oil the bottom and sides of a 13x9x2 rectangular pan and dust the bottom and sides with some powdered sugar (I didn't have this, so I used two round 9 inch pans. Tip for the confectioner sugar: if you don't have a Pampered Chef Flour Sugar Shaker, you really need to get one. This makes this step and steps #7 and 8 so much easier!) 
  2. In your standing electric mixer or a large bowl, sprinkle gelatin over 1/2 cup of cold water and let stand to soften. 
  3. In a 3 quart heavy saucepan, cook granulated sugar, corn syrup, second 1/2 cup of cold water, and salt over low heat, stirring with a wooden spoon, until sugar is dissolved. Increase heat to moderate and boil mixture, without stirring for about 12 minutes. Remove the pan from heat and pour sugar mixture over gelatin mixture, stirring until gelatin is dissolved. (NOTE: no matter how delicious the sugar mixture looks or how it doesn't feel hot to the touch on the wooden spoon DO NOT give in to the urge of tasting the sugar mixture. It burns a hole in the roof of your mouth and hardens immediately so that it is difficult to remove from between your teeth...not that I know from experience or anything) 
  4. With a standing or hand-held electric mixture until white, thick, and nearly tripled in volume, about 6 minutes using a standing mixture or 10 using a hand-held mixer. (This is very thick. My standing mixture began shaking at the end, so just be careful and don't burn your motor. That would be a sad, sad story) 
  5. In a separate medium bowl with cleaned beaters, beat egg whites until they just hold stiff peaks. Beat whites and vanilla into sugar mixture or until just combined. 
  6. Pour mixture into baking pan and don't fret if you don't get it all out (Tip: spray your spatula or spoon you are going to use to get mixture with butter or butter flavored cooking spray. I learned this from making rice crispy treats one time). 
  7. Sift 1/4 cup of powdered sugar evenly over top. Chill marshmallows, uncovered, until firm for at least three hours and up to one day. 
  8. Run a thin knife (again, butter coated) around the edges of the pan and invert pan onto a large cutting board. Lifting up one corner of the inverted pan, with fingers, loosen marshmallows and ease onto the cutting board. With a large knife (buttered), trim the edges of the marshmallows and cut marshmallows into 1 inch cubes. Sift remaining powdered sugar back into your now-empty pan(s), and roll the marshmallows through it, on all sides, before shaking off the excess and packing them away. (I actually just dumped some powdered sugar into a large ziplock bag, dumped in the cut up marshmallows while doing a light sugar dusting in between dumping, and then shook the zipped up bag. It worked the same). 
  9. Do Ahead: Marshmallows keep in an airtight container at cool room temperature 1 week. 
So after I made these, we went outside and roasted some on our new fire pit. LOVED it and I'm making a batch (cut out in stars) for Abigail's star-themed birthday party this weekend. This makes almost 100 marshmallows, so you should be good for a while. Try these! They are yummy! 


Sticky, Sticky Mess!

This is just the first batch. SO MUCH! 

Monday, January 9, 2012

Monday's Devotion: Good and Perfect Gifts

"Everything good comes from God. Every perfect gift is from Him. These good gifts come down from the Father who made all the lights in the sky. But God never changes like the shadows from those lights. He is always the same." James 1:17


Last night I went on a date. Okay, it wasn't really a "date", but my husband set me up on a coffee date with another mom. Our husbands thought it would be a good idea that we actually get out and away from the kids for a while to just talk and sip coffee. And as crazy as our lives are (as all moms' lives are), we went out for coffee and stayed until they kicked us out only to continue our conversation for another 30 minutes in the parking lot. What did we talk about? Our kids. Mostly our kids. And after talking about the struggles and joys we go through every day in our homes with our children and husbands, God opened, no reminded, my mind of the gifts I have in my children. I, as so many other moms do, struggle with making sure my children are well-behaved. It warms my heart to hear other people talk about my kids' good manners and how they really enjoy the company of my kids. I have such high expectations for my kids, that I am in constant stress-mode to make sure they are working towards those expectations. And then God said through my friend last night, "They are kids. They are well-behaved, but they are kids, and are going to act like kids."

This morning as I was doing my devotional, two things happened: 1: Although my devotion wasn't necessarily about kids, God kept tugging at my heart with little reminders that my heart needs to be in the right place when I discipline my children, and I need to set reasonable expectations for them. and 2: My children are God's gifts to me. Psalm 127:3 says, "Children are a gift from the Lord, a reward from a mother's womb." He felt I could do this job; I could raise my kids in a way that is pleasing to Him. So many times I forget that they are His gift. So many times I let Satan encourage me to be overly harsh with my words or I discipline when I should just explain.

This week I prepare my home for my youngest child's 3rd birthday party. Planning those types of events excite me and frustrate me all at the same time. I love to get creative and find ways to create memories for my children and their friends. But that also means that my patience has a small fuse. I want things to be just right. I want everything to go smoothly. And with kids, that never happens. I thank God that He has reminded me of the gifts I have in my children. One of my goals this year is to speak softer to my children. I didn't do such a great job last week, but the Lord has given me another week to train myself to be a better mom.

Here are some ways to pray for your children. Remember, they are God's gifts. Treat them as so.

1. 31 Ways to Pray for Your Children
2. 31 Biblical Virtues to Pray for Your Children
3. Prayer Calendars 

So blessed with three crazy kids! 


Saturday, January 7, 2012

Friday's Review: NYR, week 1 and Ever So Sweet Bakery

Here it is Saturday night, 1 hour before Sunday, January 7th, and I am finally able to sit down to do Friday's post. As mentioned last week when I reviewed a book, The Duchess and the Dragon, I have decided that Fridays will be my reviewing day. I am also going to hold myself accountable this year with my New Years Resolutions by using Fridays as a day to review how well I have been sticking to my goals. Let's hope I can really do my best this year!

REVIEW (local business) : Ever So Sweet Bakery, Summerville, SC

One minute from my house is the cutest little bakery called "Ever So Sweet". I denied myself the pleasure of going in there because I'm trying to lose weight, dern it, and going to a bakery was not going to help it. But one beautiful Sunday afternoon as we were heading home from church, Joe suggested we stop by to get dessert for after lunch. And of course, I said "yes!" When I went in, I was pleasantly surprised at the selection they have! This bakery is not a chain; it's a family owned (pretty sure) local business that really specializes in all kinds of goodies. I have tried everything from cake, to cupcakes, to scones, to bagels, to tarts, to a loaf of french bread (that went lovely with the soup I had in the crockpot at the house). Everything. Is. Wonderful! The Sundays that we don't make it before they close (1 pm on Sundays), my kids are terribly upset. And that is a good sign of a great business. 

As for customer service, I could not say enough great things about them. The gentleman that serves us every Sunday is so incredibly nice, and he recognizes us every time we come in. They truly are wonderfully nice people. 

Here is a link to their Facebook page. They are really good at updating their information and sharing new things online for their customers. If you are ever in the Summerville area, you really need to check them out! Below is a picture of one of the things Abigail and I got right before Christmas. 

Fudge Peppermint Brownie (this was half of it) and Spice Cake Cupcake with Chocolate Butter cream icing

New Year's Resolution 2012 Review: 

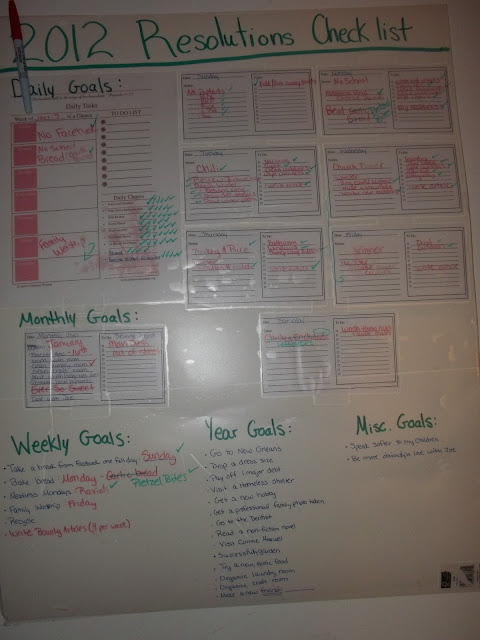
So week 1 of 2012 is done. This time last week I was fighting sleep just so I can see Lady Ga Ga (two words? one? whatever) and Mayor What's-His-Face push the button for the big ball to drop. I was determined to make sure that I stick to my goals I have set for this new year. I made a big poster board with a checklist of daily, weekly, monthly, and overall goals for this year, laminated it, and I use a red dry erase marker to write the daily and weekly goals, and then use a green dry erase marker to check off the goals. It's really been great at keeping me accountable. Why just about 2 hours ago I glanced at the list and realized that I hadn't done today's only chore (wash throw rugs and bathroom towels). So, I hurried my tush on to complete these chores. And this morning a friend (hi Audrey!) of mine checked out my list and volunteered to help me with one of the goals for this year. I really like that! I like that we are all in this together. So in my review of my goals this week, I am going to share how I've done so far. Below are two things: a picture of my goals at the end of this week (if you checked out the NYR 2012 page, you will see the picture without the checks, this one will be what it looks like at the end of the week) and the list with the new adjustments and completions. I hope this helps to spur you to make some good goals and stick to them this year! 


List: 

  • Do a devotion EVERY DAY (I missed 1 day...today) 
  • Organize daily schedule (Yay!) 
  • Take a break from Facebook one full day a week (So far so good! Sundays may be the day every week)
  • Walk every Wednesday and Friday (I walked Wednesday and did circuit training Friday. Fair trade)
  • Bake bread at least once a week (Twice this week! Loaf of bread AND pretzel bites!)
  • Go to New Orleans
  • Go down one dress size
  • Meatless Mondays (Ravioli! Yum!) 
  • Speak softer to my children (Nope. Not a good mom this week) 
  • Be more obvious in my love for my husband (eh. Did okay. Could always do better. Goal, right?) 
  • Make freezer meals at the beginning in the middle of each month (works out for us better with our budget)
  • Go to lunch with my mom once a month
  • Pay off a major debt
  • Clean/organize the pantry room (DONE! although this will stay on the list as a reminder each week)
  • Clean/organize the craft room
  • Have the youth over
  • Have the college kids over (Date set!) 
  • Make a new friend (not an acquaintance, but a friend) (Hey Audrey!) 
  • Stick to chore schedule (Missed one day!) 
  • Stick to reward/consequences chart (Missed one day!) 
  • Have family worship once a week (It kept getting moved because of circumstances. This WILL happen!)
  • Take the kids to volunteer at a homeless shelter
  • Visit Connie Maxwell
  • Find a new hobby
  • Have one sewing project a month
  • Promote a local business on my blog once a month (Done for this month! See above) 
  • Get a family photo done (professionally) 
  • Go to the dentist
  • Have a date with the husband once a month
  • Try a new, exotic food
  • Have a successful garden 
  • Read a non-fiction book 
  • Go to bed with a clean kitchen (Done EVERY NIGHT this week!!! Yay!!!) 
  • Recycle (I put it out, but they didn't pick it up! Is my junk not good enough?) :( 

  • I hope this helps you! Have a great week! And don't forget to try out Ever So Sweet! 

    Thursday, January 5, 2012

    Thursday's Crafting: DIY Cake Plates

    This year for Christmas, I went on a spree of making the gifts we gave. Most of the stuff was either things you put on food (meat rubs) or things you put on your body (bath salts or hand scrub), but one of my favorite things I made this year was a cake plate. This only took a few minutes of my time and just a few bucks. I know that people are scared to make gifts that cost little for risk of sounding cheap, but it doesn't have to be that way. As long as you put your heart into it and it comes out beautiful, then who cares that it only cost $5? If you are still game, then check out the tutorial below.

    Things You'll Need:

    • Plate (I went to Goodwill and found a beautiful set of plates for $2)
    • Candle holder, glass or porecelin cup (I went to The Dollar Tree and picked up a few candle holders, 2 ice cream cups, 2 glass coffee cups, and 2 very beautiful drinking glasses) 
    • Super glue (Make sure that if you are using clear glass, get the kind of glue that is meant for repairing glass. The regular stuff dries yellow) 
    • (Optional): pencil 
    • A Heavy book

    Instructions
    1. Wash dishes and candle holders. Dry completely. 
    2. Turn the cake plate face down. Decide which part of the candle holder you want attached to the plate and the part to hold the cake plate up. Spread a thin layer of super glue to the part of the candle holder that is going on the plate. Quickly and carefully attach the candle holder to the plate. Make sure you are careful to put it exactly where you want it. You may want to measure where you want the candle holder to go before you glue it. Use the pencil to mark where the candle holder will go. Please note, the glue dries quickly (as fast as 15 seconds, depending on the glue you get). Once you have it glued down, you may not be able to move it. 
    3. Leave the cake plate face down. Gently lay a heavy book on top of the bottom of the candle holder. This will apply pressure you need to help set the glue. 
    4. Your cake plate can be ready as quickly as 5 minutes, but I recommend you let it sit for 24 hours. 
    Voila! You are done! Check out the pictures below for examples I did. This can be a great last minute gift for a friend or something you can make for your own home. Have fun with the type of plates and holders you use. Happy crafting, everyone! 

    I made a candy dish for a friend and made the bath salts to go with it. 

    The plate I made for my mom. Isn't it pretty? 

    Here's an close up look of the glass I used. 

    Wednesday, January 4, 2012

    Wednesday's Cleaning: Room by Room Series: The Bedroom

    I'm back! Christmas break really threw me through a loop with keeping up with the schedule. So, just like most American's I have made a New Year's Resolution (well, quite a few, actually), and part of that is to keep up with the cleaning and blogging. So here's to helping you get organized as I work on getting organized.

    I am picking up with my "Room by Room" Series. In case you missed the past ones, here are the links:

    Starting this week, and finishing next week (hopefully), I will be focusing on the bedroom(s). The link I'm going to be reviewing is below, as well as another great resource that is featuring cleaning the master bedroom this month. Remember, I am only highlighting some of the tips that we are given through A Virtuous Woman. Please see the link below for a full detail. It REALLY is a great resource. 

    • Cleaning the Bedroom is the download from A Virtuous Woman I will be highlighting. 
    • Household Notebook is the link where you can find all the downloads I highlight and some I won't be highlighting. (This is also where I got my downloads for my New Year's Resolution Checklist).  
    • Home Organization from Just Mommies. Do yourself a favor and check out this website. You won't regret it. 
    and now presenting....

    The Bedroom
    1. Bedroom linens: (she gives a quick review of the things that are typical of items found on a bed) 
    • Mattress Cover and Pad. I'm not really sure why it took me so long to get me one of these, but I got one this past summer for my own bed. The kids have always had one, but I never thought I would really need one for myself and my hubby. That is until one of those home cleaning people came by my house to show off a nifty vacuum cleaner...I mean "Home Cleaning System". They did a quick vacuum of the Abigail's mattress to show how much dirt we leave in the mattress, and I was really grossed out. At least with a mattress cover and pad I can trap some of that dirt to wash once a week or so. Think about how clean your mattress is once you lay down on a clean one! Get one if you don't have one, and make sure you wash it at least twice a month. 
    2. Monthly caring for the bedroom (highlights): 
    • Rotate and flip mattresses. I do this, but not as frequently as I should (about every other month). I also like to spot treat anything on the mattress before I flip it. That way I know when I flip it again, I will be laying on a clean side. 
    • Air throw rugs and pillows in the sun. Huh. Never thought of this before. Really? In the sun? Why not? The dog likes to lie in the sun, why not the rugs and pillows, too? 
    • Vacuum under the bed. Uh...I'm such an "undercover" hoarder when it comes to under my bed. But it's always an adventure when I rearrange my furniture. If I could just get in the habit of vacuuming under my bed, maybe I wouldn't dread moving the furniture so much. 
    3. Weekly caring for the bedroom (highlights): 
    • Dust. Really, I dust the rest of my house because people see those places. I tend to neglect the bedroom. But last night as I was looking around my room (especially since the Just Mommies website is focusing on cleaning the master bedroom this month), I noticed the layer of dust on, well, everything. My bathroom is dust-free, my hallway is dust-free, my FANS  are dust-free, as well as my living room and kitchen, but the layer on my bedposts, side table, and the molding above the closet is pretty thick. This is going to be added to my weekly cleaning for sure! 
    4. Daily caring for the bedroom (highlights): 
    • Air the bed. There will be more on this next week when I cover how to properly make the bed, but I was just awed by this. If you sleep with a man (your husband), you know the funky smells that can come from a man at night. Why do we trap them in the bed first thing in the morning? Air that baby out! 
    • Put away things. Yup. Last night you had a glass of milk or a cup of hot tea before you went to sleep, and now it is sitting on your night stand. I have been guilty of leaving a dish on my night stand for a week before I walked it to the sink. Taking it to the sink first thing in the morning is a new habit I am forming. It's a good one to have. 
    So that is part 1 of cleaning the bedroom. Next week I am going to blow your mind with how to properly make your bed. Stay tuned and happy cleaning! 

    Photo Credit

    Tuesday, January 3, 2012

    Tuesday's Food: Twice Baked Stuffed Potatoes

    Mmm....potatoes. I really, really love potatoes. My waistline doesn't, but boy, when it turns cold outside, potatoes are just so nice. Last week I decided I wanted to serve potatoes for dinner, especially since we were running low on everything in the pantry and freezer. I wanted to make sure that I didn't tip the scale in points for weight watchers, so I checked out what they had. I found a great recipe that I adapted that I want to share with you. And honestly, my family LOVED it!

    Ingredients:

    • 5-6 baking potatoes
    • 1 Tbsp olive oil
    • 2 cups of greens (I used collards) 
    • 5 oz of lean ham or 1 package of country ham pieces
    • 1/4 cup evaporated milk OR 1/2 cup of 1 % milk
    • 1/8 tsp salt
    • 1/8 tsp cayenne 
    • 1/4 cup cheese 


    Steps
    1. Wash baking potatoes and then wrap in foil. Bake on high for 6-8 hours. This is the longest part. The rest of pretty quick. So do this first thing in the morning before you go to work or school. 

    2. Using a pot holder, unwrap the potatoes and then cut off the top of the potato. Scoop out the insides, but be careful to not do too much. It will cause your potato to fall apart. Dump the insides of the potato into a big mixing bowl. Place the potato shells back in the crockpot or into an oven safe bowl. Preheat the oven to 350. 

    3. In a large skillet, saute the greens for 2-3 minutes. Add the ham and cook until the ham begins to look a little crispy. 6-7 minutes. Add to the mixing bowl with the potato insides. (ALSO if you do not have evaporated milk (like I didn't), boil the milk for 2 minutes, then set aside. Add to the potato mixture when you add the collards and ham. )


    4. Add cheese to the potato, greens, milk, ham mixture, add the spices, and gently stir until well blended. Stuff the potatoes. Place the stuffed potatoes back into the oven safe bowl and bake for about 10 minutes, or until the cheese has begun to melt. 


    5. Then you are done! I know it looks messy, but aren't most great tasting meals? You can serve this with another side, such as broccoli or some bread, but it's really not necessary. I added a biscuit to our meal, but really the potato worked great! 


    This meal was perfect for a cold evening, the kids told me I was the best mom ever, and I even heard my husband bragging about it to another dude (my dad) about a week later. That kind of praise sure makes me want to put this on the regular rotation! 

    Weight Watchers Points Plus: 7 pts!!!

    Sunday, January 1, 2012

    Monday's Devotion: Becoming Better this Year

    "I don't mean to say that I have already achieved these things or that I have already reached perfection. But I press on to possess that perfection for which Christ Jesus first possessed me." Philippians 3:12


    Yesterday's sermon was on Philippians 3:12-16 and how we should move forward in this new year. As we were covering these verses, that first part kept catching my eye. It's amazing how true Paul's words are! Paul, the dude who wrote a good portion of the new testament, and encourages Christ's followers to live fully for Him (the Lord), admits that he hasn't met perfection; that he hasn't reached his goal. No, not his goal, but the goal that God has prepared for him. Paul expresses his desire to continue striving to glorify the Lord with his words, actions, thoughts, all of him. If you are familiar with these verses, they go on to say that Paul he is going to forget what is behind and press on to the goal. Paul's words, here, are really inspiring to me! As the pastor spoke about yesterday, he explained that Paul said he was "forgetting what was behind him". Letting go of the past! Moving on! The preacher then went to explain that meant to not hang on to past because that can really keep us from moving on in the future. Refusing to forgive someone, thinking of how things "used to be", or even (and this one hit me square in the face) bringing up past victories over sin. All of those things keep our feet planted in the past! They keep us remembering how we used to be instead of working on who God wants us to be. We are always in the need of improving!

    In keeping with how God always presses a point in a few different ways to make sure I got it, this morning's devotion was on Matthew 26:41, "Watch and pray so will not fall into temptation. The [heart] is willing, but the flesh is weak." As I was making my list, yes, I said list of New Year's Resolutions, my biggest goal was to make sure my goals for this year were reasonable (for example "go down one dress size" as opposed to "dropping 25 pounds"). I also wanted to make sure they were clear. I can't just say, "be a better daughter." I needed to be specific. Because although my heart is willing to be a better daughter, I needed to lay out specifics for myself to help me to attain that goal. So instead, I decided that I would like to have lunch with my mom once a month (if I do this more than once, GREAT, but at least once is an attainable goal). This morning's devotion was very clear about not giving in to temptation. My heart is beyond willing to have a daily devotion, but I know that if I don't become disciplined, there will be days, or even weeks, before I really sit down with the Lord. My flesh is weak.

    So the moral?

    1. I need to put away the past. No, I did not reach all my goals last year. Yes, my feelings were hurt last year. But the important thing, just like Paul mentioned in Philippians, is that I need to put the past behind me and keep looking forward, to the goal Christ has set before me. Learning means to see the mistakes you made yesterday, so you can move forward a better person today. It does not mean to keep looking at yesterday to beat myself up for failing or to beat someone else up. I have to keep the past there so I can move on now.

    2. Be specific in how I can reach those goals. I know my personality. I know that I need specifics, and I need to write them down, and I need to check them off. I also need to recognize the roadblocks that have kept me from the goals in the past and prepare for them for the future. I don't have to dwell on the past (see #1), but I need to learn from it so I can move on. All of those things hold me accountable. For me, writing my goals for this year down on a big poster board that I can check off is exactly what I need to make sure I keep my eyes forward, on the prize.

    3. Avoid roadblocks and detours. Life gets in the way. This morning, I wanted to hit that snooze button again so I can sleep in one more day before school starts tomorrow. But I knew that if I didn't get up before the rest of the family, I was never going to get my devotion in; I was never going to get today's blog up; and I was never going to get in my 30 minutes of exercise in (another goal for this year). I set that alarm clock, went to bed early, set out my work out clothes, and made a point in my mind to not fall into temptation to sleep just a little bit longer. I don't know about you, but I have to set up precautions for me to not run into roadblocks or take that little detour if I want to keep my eye on the prize.

    I want to become better this year. I want to glorify the Lord with my words, actions, thoughts, all  of me. I want to win the race God has set before me with flying colors, and the Lord has given me a new year, each year, to learn from my mistakes, and to prepare for the long journey ahead. May you be blessed this year and may you run the race God has given you with grace and endurance. May this year be a truly new year for you to look forward and let go of the past. May your heart and mind be willing to press on!


    Photo Credit