'Tis the Season for baking, and a cook's best friend this time of year can easily be a can of Pillsbury Crescent Rolls {see this link for recipe ideas...and no, they do not pay me for suggesting them}. Since I've gotten pretty handy at making most of my own bread products, and since my husband loves a good crescent roll, I figured I would give that flaky, buttery bread a shot.
So...on to Pinterest. I found a recipe that liked the finished product, but the process was NOT fun. NONE of my dough was looking anything like the pictures. AND I was practically dropping globs of dough onto my stone and hoping they came out right. And they did taste yummy, but it was not a recipe I was going to pass on...yet. {I'll be posting the original recipe link below in a minute in hopes that one of my cooking friends will try it and maybe tell me what I did wrong}.
I then adjusted the recipe. The second batch was much easier to work with. I added another cup of flour to the original recipe, changed when I added the ingredients, and floured my surface A LOT more, and ended up with some yummy biscuits. That's right, I said biscuits. They were good, but were not flaky like those crescent rolls I love so much.
And then I adjusted the recipe again. This is the recipe I'll be sharing with you. These were still messy. They weren't as flaky as the first batch, but not biscuits. I almost overcooked them as well because they were just so fluffy when I pulled them out, that I thought they weren't done on the inside.So after three tries, I'm going to give you my best effort. Enjoy...and I got the original recipe from The Big Red Pot.
Homemade Crescent Rolls
Ingredients:
- 2 1/4 tsp yeast
- 1/2 cup warm water
- 1 Tbsp, plus 1 tsp sugar
- 3 1/2 cups flour, divided
- 1/2 tsp salt
- 4 Tbsp salted butter, room temperature
- 1 Tbsp butter, frozen
- 1 Tbsp butter, melted
Directions:
- In a large mixing bowl, dissolve yeast and sugar in the warm water. Let sit for 5 minutes until foamy.
- Add 2 1/2 cups flour, salt, and room temperature butter. Mix on low speed, until well blended. Cover with a clean towel, and let sit for 45 minutes.
- YOU ARE GOING TO NEED AT LEAST THE REST OF THE FLOUR FOR THE NEXT STEP. Be prepared for a mess.
- After 45 minutes, pour the dough onto a WELL-FLOURED surface. Make sure your hands and any utensils you use have flour on them as well. The dough is super sticky. Roll into a large circle {the recommended size in the original recipe was a circle with a 12 inch diameter. This was too thick for me}. Using a floured pizza roller, cut your triangles {again, the recommended number was 12, but I'm pretty sure all of mine yielded more than that}.
- GRATE your frozen butter over the triangles.
- Roll the crescents, starting at the large base {opposite of the point of the triangle}. I used a very flat floured spatula to help me flip the dough over and over until I reached the tip of the triangle. This seemed to work best. Place the rolls onto a stone or a well-oiled baking sheet. Cover with a clean towel.
- Keep the rolls covered while heating the oven to 400 degrees.
- Uncover the rolls and bake for 18 minutes.
- When they remove, brush with melted butter.
 |
| Here's my beautiful daughter helping me out. |
 |
| SO MESSY. See how the well-floured ones turned out like crescents [top] and some were more globs [bottom]? And my fingers were well covered and super sticky. NOT fun. |
 |
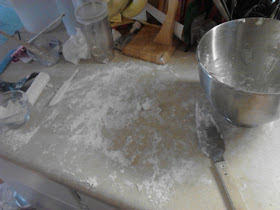
| This was my counter afterwards. SO much flour. |
So you see here that once you figure out how to make them, you can go crazy with what you put in them. I made one batch that I filled with cinnamon sugar and served for breakfast with a powdered sugar icing. The kids loved them.
Give them a try and let me know what you think.


No comments:
Post a Comment